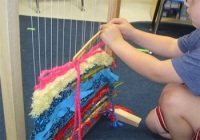
I was so moved by this weaving I found while visiting Creative Care for Children, a family childcare owned by Danielle Monroy in Santa Barbara, CA. It seemed to transform an already lovely room into an artful studio space. The children at Creative Care created so many weavings on this one classroom loom that Danielle said she often ran out of wall space to display them!
I loved the unique shape of this one with its irregular sides. It felt like “real art” and reminded me of the many folk art weavings I had admired over the years at art festivals and craft fairs.
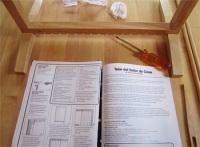
I was truly inspired, and ended up ordering the same loom so I could try it out myself. (Classroom Loom – STLOOM). Thus began my journey into weaving. I took photos of the loom assembly to show you here, so I could share my story and perhaps invite you to do the same. The loom is just $29.99 and about the best deal around for a holiday gift. I assembled the loom in about 15 minutes, and then took another 15 minutes to thread it (called “warping the loom”). All materials were included and the instructions were visual and easy to follow (whew).
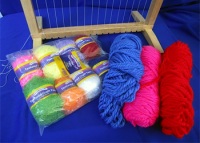
Along with the loom, I ordered Textured Crafts Yarns (TEXYARN) to which I added leftover yarns from another project, Jumbo Roving Yarn (ROVING). You may have yarn scraps of some type around, and if not you can work with a combination of donated and purchased yarns. I was very happy with the Textured Crafts Yarn, they are fluffy, colorful and fun to work with. If you have a fabric scrap bin, tear strips of fabric and weave with those as well, or be creative with old t-shirts.
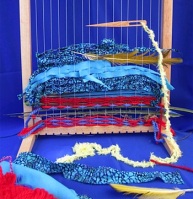
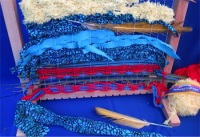
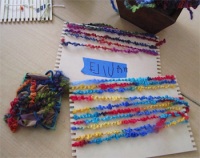
Here’s a close-up where you can see the combination of yarns, fabric strips, and even a few bird feathers (we own a large macaw so that part was easy). Half the fun of weaving is figuring out what to weave with. It’s more interesting if you incorporate the odd feather, strip of newspaper, pipe cleaner, or plant material from your yard.
Instead of finishing my weaving, I donated it to a 4-year-old classroom at Pressman Academy where I asked mentor teacher Francine Farkas to incorporate it into her classroom. Her 4 year olds finished the weaving and were so enchanted with it, Francine told me weaving was now her favorite new art form.
Later that same month, I visited Little Owl Preschool in Long Beach and noticed children working on smaller individual looms (Beginner’s Wooden Looms – RLOOM). These individual looms were a lovely counterpoint to the Classroom Loom that I had fallen in love with.
I can’t say enough about the learning that takes place when children approach a weaving project. Weaving teaches children many developmental skills while offering a creative and challenging learning experience. As they weave, children learn patterning, critical thinking skills, problem solving, and they learn to create 3-D art, or think in three dimensions. By weaving in and out in a pattern, children learn to coordinate their eyes, hands and minds; and they also cross the midline, which reinforces brain development between the right and left hemispheres.
Last but not least, weaving appeals to our innate human desire to experience patterns and rhythm. Humans are pattern-seeking animals. Weaving helps us slow down and enjoy the rhythm and pattern of repetitive motion as we weave in and out, over and under, around and through a series of warp threads. Weaving can even reduce stress and provides a positive community activity where children work together.
Remnant Yarn (5LBR)
Colorations® Acrylic Yarn (YARN)
Colorations® Chunky Acrylic Craft Yarn (CHUNKYRN)
Embroidery Thread (EMBSET)
Rainbow Stain Beading Cord (RAINCORD)
Tipped Lacing Yarn (YARNTIP)
Tipped Lacing Cords (TIPPED)
Rexlace® Favorite Lacing Cords (PRIMARY)
Quill Feathers (LGQUILL)
Assorted Ribbon Remnants (RIBBONS)
400 Feet of Satin Ribbon (SATIN)


I love this post Anna! I'm going to look at that loom. I've done weaving with kids, using cottage cheese type cartons, where they created a basket type structure. thanks for the inspiration!
Anna, I'm so excited about your post and want to try weaving on a look like yours with my Pre-K class. I know they will love it and it promotes so many good skills. The loom will be on my Christmas list for sure. Thanks
Nice post.The post reflects some creativity too.Thanks.
Anna,I love this post, and every other one I had time to read. I could get lost in the information you share in your blogs. I love the weaving project. How creative, yet open ended. It is about the process or young children, although through the process, such beauty is created. Thank you for your insight, it was like finding a buried treasure for me. Children should be introduced to a variety of art processes. I believe it is very therapeutic, and at the same time it fosters high order thinking. I will be back to read more of your blogs, they are so enjoyable, and very educational.
I love your blog, Anna! Its very inspiring and informative 🙂 I'm also into art workshops for children and enjoy creative activities with them. I also love to paint whenever I find time. I came back to your blog while on Google and would like to add yours to my favorites! Thank you for sharing!
Anna, what do you do with the piece when the children have finished weaving the whole thing?
FINISHING OFF YOUR WEAVING TO HANG IT:To answer Faige's question about what to do with the finished weaving, you can simply take it off the loom and hang it on the wall. Try adding a dowel to the top and bottom to hang it from. Or use masking tape to finish off the top and bottom, and create a surface from which to nail or use "push pins" to hang it onto a wall.Thanks – Anna