Finger Weaving for Fun and Math

anna finger weaving 1

I just came back from our annual sales meeting where we got to play with all our new products. The creative talents of our product development staff continue to amaze me, and I’m happy to say after 15 years of working for Discount School Supply®, I still love my job. And why not? I get to share creative ideas with people like you, and know that I’m helping make a difference in the lives of children.

Let’s talk a walk down “memory lane” and recall the simple woven “pot holders” that many of us made as children. Do you recognize them pictured here?

anna finger weaving 2

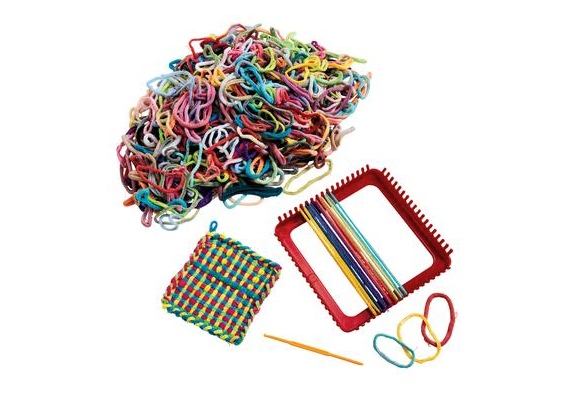
It’s a new product in our Arts & Crafts, and it brought back many childhood memories.  When I was in early Elementary School, I was obsessed with making pot holders in every color imaginable. Did you make them too? If not, it’s never too late to start this simple and affordable weaving process, typically for children ages five and up. Not only is it fun, it’s a great learning tool that exercises pattern-making skills, problem solving, critical thinking and fine motor dexterity.

anna finger weaving 3

anna finger weaving 4

But with summer here, I also recalled how my own two children loved “finger weaving” with just the loops themselves when they were young.  So I grabbed my computer for a refresher course on finger weaving and started making these necklaces and bracelets.  Pretty soon my friends were learning how to finger weave too. It is contagious, calming and creative. For clear instructions on how to finger weave, here’s the perfect resource from the Internet:

anna finger weaving pinterest tutorial

click picture to see the full size

Or, check out this YouTube video for more fun instructions!

Let’s get Practical:

How many bags of loopers would you need for a group of children? Our small group made eight long loop necklaces and a few bracelets with one bag. I’d recommend ordering one bag for every six or eight students, and at $5.99 a bag that is a very good summer deal!

anna finger weaving 5

This is a perfect summer camp and vacation activity because once kids learn how to finger weave, it’s a completely self-directed and loved by boys and girls alike. Pack a bag in the car with you before you go on a family vacation, you’ll be glad you did.

PS – What about math? Loom weaving and finger weaving both exercise fundamental math skills, like these from Teacher Quicksource®.

1. Recognizes Spatial Relationships. The child is able to understand positions and direction, such as right-left, top-bottom, behind-in-front, between, under, over, etc.

2. Classifies and Sorts by Attributes. The child can classify and group objects based on the similarities and differences of the attributes of each object, such as color or size.

3. Creates Patterns by Extending and Comparing. The child can copy, extend or create a pattern, such as colored blocks: black,red, black, red, black ….

4. Understands the Concept of Measurement. The child understands that objects can be measured using height, weight, and capacity

Have a wonderful summer!  Anna

Materials Used:
Loopers – 16 oz Jumbo Bag (LOOPS)
Weaving Loom and Hook (LOOM)

* Brought to you by Discount School  Supply®

Weaving with Young Children

Weaving is a traditional art activity that most children enjoy. It’s probably easier than you imagine to introduce a loom into your classroom. Weaving on a “classroom loom” brings children together in a collaborative learning activity and provides a unique experience that ignites curiosity and imagination. Boys and girls will often spend long periods of time weaving together at a classroom loom, experimenting with a variety of yarns, collage strips and other raw materials. Weaving is fun, it’s challenging, and it enjoys a long, historic tradition across world cultures.

I was so moved by this weaving I found while visiting Creative Care for Children, a family childcare owned by Danielle Monroy in Santa Barbara, CA. It seemed to transform an already lovely room into an artful studio space. The children at Creative Care created so many weavings on this one classroom loom that Danielle said she often ran out of wall space to display them!

I loved the unique shape of this one with its irregular sides. It felt like “real art” and reminded me of the many folk art weavings I had admired over the years at art festivals and craft fairs.

I was truly inspired, and ended up ordering the same loom so I could try it out myself. (Classroom LoomSTLOOM). Thus began my journey into weaving. I took photos of the loom assembly to show you here, so I could share my story and perhaps invite you to do the same. The loom is just $29.99 and about the best deal around for a holiday gift. I assembled the loom in about 15 minutes, and then took another 15 minutes to thread it (called “warping the loom”). All materials were included and the instructions were visual and easy to follow (whew).

Along with the loom, I ordered Textured Crafts Yarns (TEXYARN) to which I added leftover yarns from another project, Jumbo Roving Yarn (ROVING). You may have yarn scraps of some type around, and if not you can work with a combination of donated and purchased yarns. I was very happy with the Textured Crafts Yarn, they are fluffy, colorful and fun to work with. If you have a fabric scrap bin, tear strips of fabric and weave with those as well, or be creative with old t-shirts.

Here’s how the Classroom Loom looked after I had assembled it, warped it, and started weaving. The loom comes with a wooden threader, so I tried weaving just with my fingers then with the threader. Both were easy.

Here’s a close-up where you can see the combination of yarns, fabric strips, and even a few bird feathers (we own a large macaw so that part was easy). Half the fun of weaving is figuring out what to weave with. It’s more interesting if you incorporate the odd feather, strip of newspaper, pipe cleaner, or plant material from your yard.

Instead of finishing my weaving, I donated it to a 4-year-old classroom at Pressman Academy where I asked mentor teacher Francine Farkas to incorporate it into her classroom. Her 4 year olds finished the weaving and were so enchanted with it, Francine told me weaving was now her favorite new art form.

Later that same month, I visited Little Owl Preschool in Long Beach and noticed children working on smaller individual looms (Beginner’s Wooden LoomsRLOOM). These individual looms were a lovely counterpoint to the Classroom Loom that I had fallen in love with.

I can’t say enough about the learning that takes place when children approach a weaving project. Weaving teaches children many developmental skills while offering a creative and challenging learning experience. As they weave, children learn patterning, critical thinking skills, problem solving, and they learn to create 3-D art, or think in three dimensions. By weaving in and out in a pattern, children learn to coordinate their eyes, hands and minds; and they also cross the midline, which reinforces brain development between the right and left hemispheres.

Last but not least, weaving appeals to our innate human desire to experience patterns and rhythm. Humans are pattern-seeking animals. Weaving helps us slow down and enjoy the rhythm and pattern of repetitive motion as we weave in and out, over and under, around and through a series of warp threads. Weaving can even reduce stress and provides a positive community activity where children work together.

Thank you for taking the time to check in, I so appreciate your interest in sharing art ideas. I hope you have a wonderful holiday season, and I look forward to reading your comments!
Materials Used:
The Classroom Loom (STLOOM)